

By Joshua Waddles
10 Dec. 2022 – Updated 4 Jan. 2026
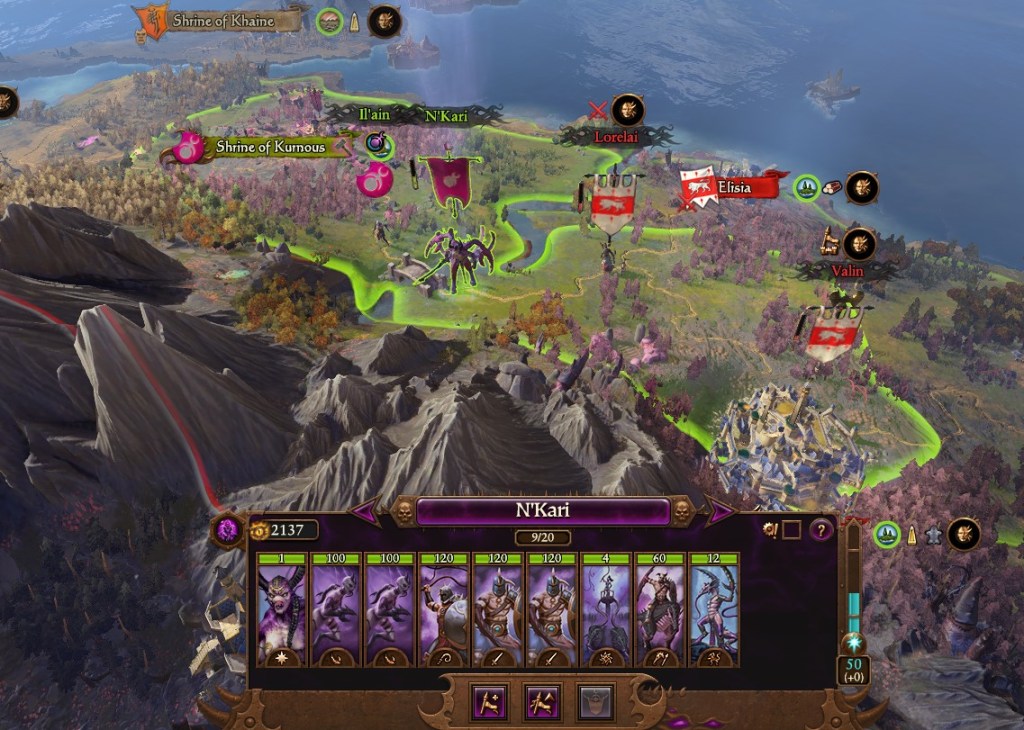
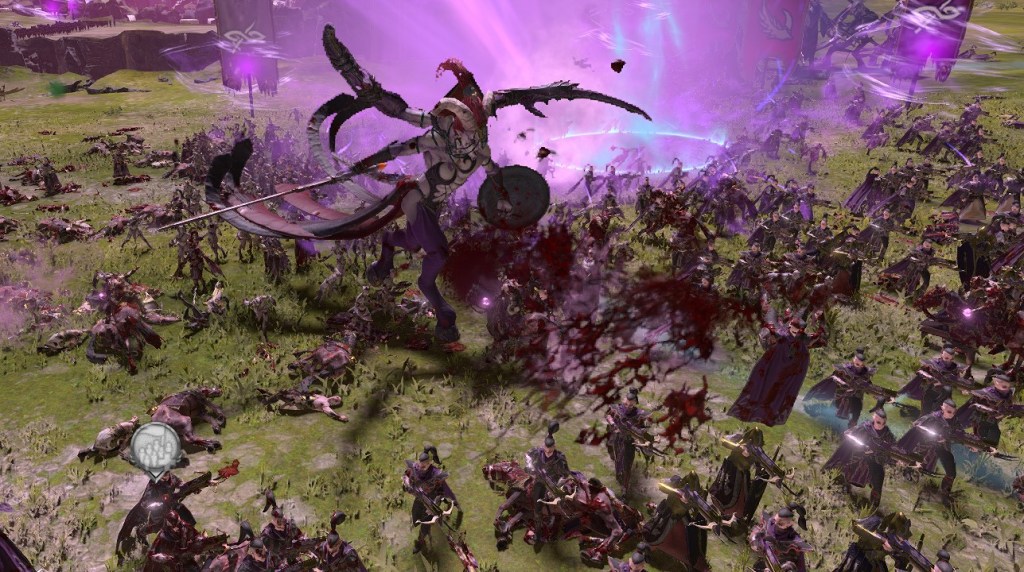
The Seducers of Slaanesh have all the tools they need to take an early advantage over most factions. They have early access to fast, armor piercing units which could make mincemeat out of the Dwarfs, they have a massive Legendary Lord that can trample over and quickly route most Skaven units and their Marauders can hold the line against Khorne while either N’Kari or his chariot hammer into the enemy from behind.
Unfortunately though, The Seducers of Slaanesh start in Ulthuan. It’s a notoriously difficult start against a race that crushes in the early game. High Elf armies typically have at least one or two cavalry units which are very dangerous to your chariots, and their Archers just love to shoot at N’Kari.
Even on Turn 1 the High Elves are ridiculously strong and they only get stronger. If you don’t want to get bogged down in Ulthuan and possibly even lose the campaign, you’re going to have to connect with some quick knock-out blows early on.
Turn 1
You start off with a non-aggression pact with Saphery and they like you. They even begin with a bit of Seduction already showing on their meter, offering a tantalizing possibility of vassalization early on. But as tempting as it is, don’t get early treaties and trade agreements with them. It’s a trap. Any agreements you make with them will get The Scourge of Kaine angry with you. There isn’t much you can do about the non-aggression pact you begin with unless you’re willing to lose your Reliability rating early in the game, but you can still get along with The Scourge for awhile as long as you don’t antagonize them further.
For your first building, you probably want to go with the Lavish Ciborium for growth. Income is important also, but it can wait.
You probably also don’t want to upgrade your Scented Pavilion. The Devoted Maraudors with Hellscourges aren’t any better than the two lower tier versions and Forsaken are too pricy.
You start off with a Cultist hero. Go ahead and embed her with N’Kari. Don’t bother summoning a Disciple Army, you’ll need the Devotees much more than extra units in these first four turns.
In the first battle
Your first encounter will be against three Spearmen, one unit of Archers and Ellyrian Reavers led by a High Elf Aristocrat. They’ll start off hiding in the woods and not moving, which is good for you because the trees make it harder for their Archers to shoot.
Let your Marauders be a meat shield. As soon as you see the enemy army, throw N’Kari and your Cultist at their Archers and send your Hellstriders and Hellflayers after their Ellyrian Reavers. Don’t bother trying to snipe the lord too early, High Elf Aristocrats are rather tanky. Avoid her as best you can while you focus on breaking the other units in her army, then overwhelm her with N’Kari, your Cultist and your Daemonettes. Use Acquiescence to lower her defense and kill her a little faster.
Take the devotees as your reward once you win, then it’s on to the next battle.
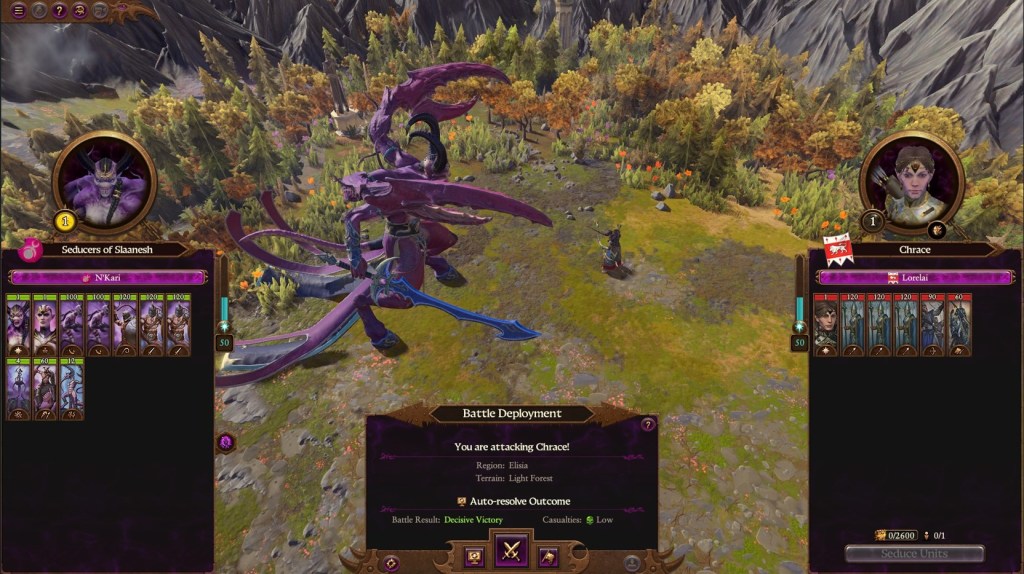
Tor Achare

In most campaigns in Total War: Warhammer III, your next move would be to take Elisia, the undefended minor settlement. This would give you time to replenish and recruit, allowing you to attack their capital with full strength, but this is not how you want to take on Chrace and Cothique. Firstly because we’re saving that minor settlement for vassalization (more on that later), and secondly because while you’re recruiting, your enemies are also recruiting and they have much better early-game units than the Seducers of Slaanesh.
For this battle, it’s probably best to seduce two of their Archer units. It may hurt your heart to spend so much money early game on units you lose at the end of the battle, but those Archers just cause too much damage.
Deploy your army in the bottom-right corner as shown on the map, out of range of the towers. This will also make the AI group their units in the corner of the settlement, allowing N’Kari to run around and break the gates at either end (or both). If you can get the AI to abandon the towners at the corner, break those gates also.
Use N’Kari outside of the walls to try and lure defenders away from whichever gate you’ve chosen to send your forces through, using Lash of Slaanesh whenever possible to damage your pursuers. Then have N’Kari join the invasion force and pour them in through the gate. If you managed to confuse the AI enough there should only be one or two units defending your entry point. They should be no problem for your fast units to pick off while you’re waiting for your Marauders.
Break your single-entity units or fast units away from melee to go after enemy Archers and keep your own seduced Archer units in a good position to add arrow support. Be extremely careful not to let N’Kari get pinned down when there’s anything nearby that can shoot at him. This guy is an arrow magnet.
Losing any units this early would be bad but in particular you do not want to lose your Fiends or your Cultist. Your Fiends are your only siege unit other than N’Kari and you’re going to be creating a second army right after this battle. And losing your Cultist would be an absolute disaster.
Since the city will go down to Tier-1 after the battle anyway, you might as well sack the city and then occupy. You need lots of money early on.
Choosing Your Next Lord
Now that you’ve taken Tor Achare, you’re going to want to go ahead and recruit your second lord. This is mostly because you’re trying to get her leveled up as quickly as possible, and also to add another single-entity unit to your arsenal.
There’s really no reason to ever choose a Chaos Lord over a Herald of Slaanesh. Even if you want to focus on the red line or the blue line in the skill true, the Herald’s blue line and red line are better. She also holds her own in melee, often scoring more kills than Cultists even without using Penumbral Pendulum.
As for which lore, you’re definitely going to want Lore of Shadows in the early game. Lash of Slaanesh does decent damage for about half the Winds of Magic cost of the Penumbral Pendulum, but it’s more awkward to use with a shorter range.
Lore of Slaanesh can be absolutely devastating later on because of Slicing Shards, but that is a higher tier ability with an extremely long casting time. The AI is likely to just move out its units out of the way unless they’re globbed up in melee, but you’ll rarely encounter a situation where you can’t make extensive use of Penumbral Pendulum.


Give her N’Kari’s Fiends as soon as you recruit her, then start recruiting units into N’Kari’s army. Marauders have much more staying power than Daemonettes for about half the price, so globally recruit three Marauders with Spears and locally recruit four. This means N’Kari won’t be able to move next turn but that’s OK, he wouldn’t have had enough movement range to reach your next target either way.
Go ahead and put your other point into Lash of Slaanesh and then grab Rout Marcher, depending on how many points you’ve got. After that, you’re probably going to want to spend your points on magic until you get Winds of Magic Reserves and Slicing Shards. Get Blissful Rapture and Acquiescence (To deal with the High Elves single-entity units) until you unlock Reserves and Slicing Shards.
As for research, there’s a lot of decent techs to choose from. Aberrant Promiscuity for the growth is probably a good start. After this it would probably be better to get the upkeep reduction techs. Pleasurable Act cost reduction sounds good on paper but it’s going to be a while before you have enough spare Devotees to make use of that either way, so it’s better saved for after you defeat Tyrion.
Before you end the turn, take your Cultist out of N’Kari’s army and park her just to the west of Elisia.

Turn 2
Elisia would be an easy conquest, but we’re going to ignore that for now. Take your Herald to the border of Cothique and put her in the Mustering stance for Winds of Magic reserves. Keep her on the Slaaneshi side of the border so her Fiends can get a little bit of replenishment.
Now there’s a crucial step that you don’t want to forget. Use your Cultist to establish a cult in Elisia. If she moved in on Elisia from the West, she’ll retreat back in that direction after she establishes the cult, giving her enough room to join the siege next turn. Now build an Excess Cult Atelier in Elisia. This building raises the cap for how many Cultists you can have by one and automatically provides one extra Cultist next turn. The Excess Cult Atelier trick has sadly been patched out.
Turn 3
Force march N’Kari to Tor Koruali, then put both of your Cultists in his army. Now declare war on Cothique and initiate the attack with your Herald and her Fiends. Heads up, this is not going to be an easy one.
Replay of the Battle of Tor Koruali
Deploy your Herald and Fiends at the green X shown below. The Ai should have all of their forces along the Southern wall expecting an attack from that angle. You have two options on where to deploy N’Kari: you can drag the reinforcement point to the western part of the map so your Marauders can get to the undefended area faster or you can deploy them in the same spot as your Herald so N’Kari can waste Cothique’s ammunition. They won’t shoot at small single-entity units anymore but the tactic still works with large lords and heroes such as N’Kari. This second option is more efficient, but you can still win without losing any units if you don’t want to cheese it
If you choose not to cheese, send your Herald to the Western side of the map as soon as the battle starts. Try to time it so she’ll get to the gate at about the same time as N’Kari and your main army arrive. You may have to hide her in the woods for a few minutes depending on how far you had to move your reinforcement point.
Once N’Kari and the others arrive, send your single-entity units ahead to break down the gates, then charge in. Don’t wait for your Marauders and Daemonnettes, that will give Cothique too much time to set up a defense.
There will be barricades to break down on your way to the victory point. Most likely N’Kari will be joined with your starting Cultist and your Herald, with your new Cultist, Hellflayers and Hellstriders trying to catch up. Try to slip N’Kari past any defenders to rush the victory point and let your Cultist keep a bunch of them pinned in melee. In these narrow corridors, your Cultist can do a good job of keeping nearly the entire army blocked, but get her some help as soon as possible.
Send your Herald with N’Kari. She can deal with any units coming from the other passage while N’Kari captures the point.
It shouldn’t be too long before your Hellflayers arrive. Use hit and run tactics with your Hellflayers as well as with N’Kari after you capture the point, Charge in to support your Cultist for a few seconds, then run back toward the victory point again. The purpose is to avoid the arrows, since the Hellflayers are as tempting a target as N’Kari is.

Depending on what the AI decides to send toward your rear flank, you should probably bring your Herald up to support your Cultist and let N’Kari defend the rear with the Hellflayers. Cothique might send Archers this way, but at least the angle is awkward and gives you places to duck for cover.
Once the rest of your army shows up, just focus on keeping the High Elf units away from your victory point until the victory meter fills. Be sure to pull back any units that are getting beat up too badly, you want to try and keep the damage spread out as evenly as possible. The exception is your Hellstriders because you’re going to want to disband them very soon anyway.
Don’t sack the city after you win the battle because you probably won’t have enough movement to occupy it afterwards. Just select “loot and occupy,” then recruit two Marauder units into your Herald’s army.
Now take one of your Cultists out of N’Kari’s army and start moving her toward Tralinia, which is on that little island just to the south of you. You won’t be able to see the settlement this turn, but you should see Eltharion and maybe you’ve got an idea of what we’re planning next.
Turn 4

If you did a decent job avoiding damage on your last battle, you have a chance of vassalizing Yvresse on this turn. But it’s going to take some luck.
Sometimes Eltharion conquers Tralinia during the end turn after Turn 3, but not usually. In three out of four test campaigns he waited in encamp stance instead of taking the settlement. If the only city he’s got is Tor Yvresse, you can vassalize him without having to fight his main army. Just be aware, you’re going to have to cheese a little bit.
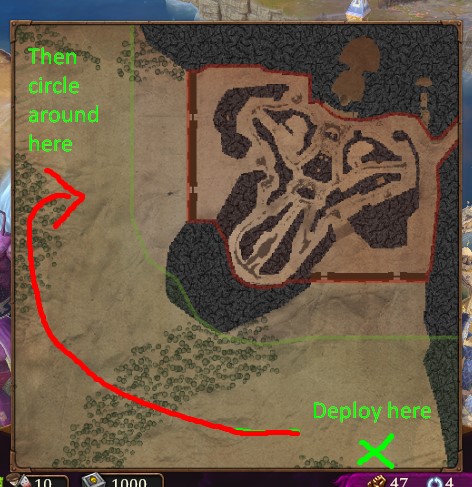
Replay of the Battle of Tor Yvresse
Attack Tor Yvresse and deploy your army and reinforcements out of tower range along one side of the map. The idea is to try and get all of the defending missile units in the same area.
Send your starting Cultist ahead toward the gate and have her attack it, but don’t actually break it open yet. The point of this is to make Yvresse waste its Warden’s Cage ability. The AI seems to prefer using that ability on units trying to enter the city, but if they decide to use that ability on N’Kari while he’s dodging ammunition he’ll die for sure, so there’s no need to risk it.
The towers are an issue, they shoot much straighter and faster than the Archer units. It helps a little bit to take the two Cultists along with N’Kari. The towers don’t share the Archers’ reluctance to shoot at small targets and they sometimes fire at the Cultists rather than N’Kari, so this takes some of pressure off of him. Other than that the AI isn’t great at making certain its towers are activated, so try to keep close to areas covered by the inactivated towers as best you can. If N’Kari does get too hurt, you can also waste ammo with your Fiends or Hellstriders in a pinch (if they’re still alive.)
The AI likes to keep a couple of Archers in reserve for this battle, but if you bring some units closer you can usually coax them out of their hiding places and waste their ammo also.
Once they’re out of arrows, get the units to glob up as best you can and spend all of your Winds casting Penumbral Pendulum. At this point you can also have a couple of units climb over the walls to get at the enemy flanks. This is best done after you run out of Winds of Magic.
You’re definitely going to want to subjugate Yvresse after the battle. They make for extremely powerful vassals, plus you get 500 Devotees with that option.
Now your Southern border is secure (for now) with a powerful vassal, plus you’ve got Skull Krag acting as a buffer between Eltharion and Etaine, freeing you up to finish Cothique and Chrace. From here you’ll probably want to deal with Avelorn, leaving Scourge of Khaine alone to shield your western border.
If Eltharion did already take Tralinia but your army’s in good shape, you could probably still manage to vassalize Yvresse. It just won’t be on Turn 4. Keep in mind that Chrace and Cothique are both still recruiting while you’re down here figuring out whether or not you want to start a new war. It would probably be better to go back and deal with them first.
If You’re Unable to Vassalize Yvresse Early
That’s a shame. But you’re still off to a very good start.
Take your army north to both of those minor settlements you passed earlier, recruiting Marauders and Marauders with Spears as you go. Go ahead and disband not just your Hellstriders but also your Daemonettes. The Daemonettes are good for carving up armored units but they die too easily against High Elves. It’s better to spam Marauders or Marauders with Spears, which are also almost half the price of Daemonettes.
Keep your Hellflayers. They’re expensive and require a lot of micromanagement, but they’re also devastating against the enemy.
You might keep your Fiends just in case you need to initiate a siege battle with your Herald again, but you probably don’t need them. You can just give her one of N’Kari’s Cultists and wait until she levels up enough for a Chaos Warshrine (which turns her into a siege attacker).
Put N’Kari’s points into Slicing Shards and give your Herald Rout Marcher before going back to her magic line.
Cothique and Chrace won’t give you too many issues at this point. Definitely vassalize Cothique and you should probably do the same with Chrace, but there is one small drawback. Scourge of Khaine doesn’t like them and vassalizing them counts as a treaty, which will make Scourge of Khaine like you less. That’s not a big deal though, especially since you’re probably going to want to conquer Scourge of Khaine anyway.
After you’ve dealt with Cothique and Chrace, send your armies back toward Yvresse. It won’t be easy dealing with them. By now they’ve probably conquered Skull Crag and they’re not the only ones who are ready for you; don’t be surprised if Yvresse, Etaine and Avelorn all declare war on you at the same time. Avelorn will cause you some anxiety for sure since they’re right next to your western border, but Scourge of Khaine owns The Phoenix Gate and Avelorn is likely to go to war with Saphery as well, so you should have time to vassalize Yvresse if you hurry.
If possible, try to isolate Eltharion’s armies so you can go at them two against one. This is tricky. For some reason the Seducers of Slaanesh get spotted often while in Ambush stance. Make sure you’re far enough away to retreat if you have to so you can come back around and initiate the attack on your own terms. At the very least you always want to be the attacker. This usually means the AI will stand still and wait, giving you a chance to waste their ammunition with N’Kari.
You’re likely to see a big Yvresse army standing in reinforcement range next to a very small Yvresse army. In this instance, use your bigger army to attack the smaller army, so you have about a minute in a half before the bigger army arrives on the field. This gives you a nice cheese opportunity.
Since Slaaneshi armies are fast, you can just race right past the smaller army already on the field (maybe leaving a few units to keep them engaged) and crowd the entry point before the enemy reinforcements arrive. Depending on if they arrive at the top of the map or at the sides, your Marauders might not quite make it there in time, but you can usually keep the reinforcements locked up against your Cultists and other fast units until your Marauders get there.
This tactic will usually shut down their missile units. Even better, it’ll keep the army packed tightly into a convenient straight line while you spam Penumbral Pendulum.
Attacking the army outside of the settlement will also draw out its defenders, so you can soften them up in a field battle before launching the siege
And now that you’ve got Slicing Shards, you’ll have opportunities to shred huge globs of enemy units. This tactic is best used in siege battles but can work in field battles also. The AI is good at dodging bombardment spells and Slicing Shards has a very long casting time, so you’re going to have to get the enemy locked into melee in order to use this effectively. Luckily, your Herald and Cultists are rather tanky and hard to hit because of their small size. The enemy will happily glob up around them even though the majority of their entities won’t even get close enough to engage, so you can just cast Slicing Shards right on top of them all. Your Herald and Cultists will take negligible damage from the spell but the enemy will be filleted. N’Kari can sometimes rack up 200 kills from casting Slicing Shards once if the glob is thick enough.
Once you vassalize Yvresse, you have a choice to make. Do you continue to Lothern and take the fight to Etaine or do you run back north and defend your cities from Avelorn? Alarielle will be there very soon so you’re probably going to need to deal with her and just trust Eltharion to hold off Tyrion for a bit. If Yvresse gets wiped out you can always just bring them back.
Dealing with Invaders

If you’ve managed to follow the steps above, you should manage to use the same tactics to defeat Avelorn and Etaine. There are a couple of other issues though. First, you’ve got the Bretonnians not far off of your east coast. They’re probably going to want a piece of you after they finish off Mousillon.
They’re not hard to deal with if you get at them early, they start off spamming mostly Peasant Mobs, Spearmen at Arms and Peasant Bowmen. You definitely don’t want to wait until they’re ready to send cavalry spam at you.
But the other issue is the Dark Elves. They like you from the start, but every time you vassalize a High Elf faction they start to hate you for it. The Scourge of Khaine shouldn’t give you too much trouble as long as long as they don’t take you by surprise, but Morathi and Malekith are going to be a big problem if they declare war on you.
One way of dealing with this is to just not vassalize too many High Elves. Lots of small vassals spam more armies than one or two big vassals, but you don’t actually need any of them. Vassals just make things much easier.
You can also declare war on Malekith and Morathi’s armies, preferably those which are far away and no threat to you. Be warned, though, there’s a bit of a quirk in this tactic. Occasionally, being at war with a shared enemy makes them like you less instead of more. This is probably deliberate on the part of CA, since Malekith and Morathi sometimes want you to pay them to declare war on their enemy instead of the other way around. It seems to depend on if the enemy you want to declare war on is very weak; Malekith sees it as you swooping in and trying to conquer settlements he had his eye on.
But if avoiding war is too much trouble, you could also just take them on. This is dangerous since Naggarond tends to be the strongest faction in the game, followed closely by the Cult of Pleasure, and they love sending tons of armies your way. But it is doable if you spam enough armies, even if those armies consist mostly of Marauders.
Your vassals will jump in also. They probably won’t accomplish much other than to annoy the enemy (although they may land a decent invasion force into enemy territory) but a distraction can be very valuable. As long as the invaders don’t get a foothold in Ulthuan they also won’t get any replenishment, so your vassals can soften up some of these armies just by zerging the invaders with low-tier stacks.
The AI also tends to get a little reckless when at sea and will often let one of its armies get isolated at Full Sail (Forced March) away from reinforcements. It’s best to hide your units in Ambush stance to try and tempt them to do this, although you still have the problem of these Ambush stances getting spotted. It may take two or three turns to make this work successfully, and it gets more difficult the more armies you’ve got.
One more effective tactic is to leave one army on land and put the other one out to sea, just close enough for the AI to initiate an attack with one of its armies but not close enough for the AI to catch you when you retreat. After the AI takes the bait its army is too close to run away, and you can come at it with both armies next turn. This is one of those maneuvers that the AI just doesn’t understand. It will feel perfectly safe attacking as long as its army is stronger than whichever army you left out at sea.
Another big issue is that Malekith tends to send a lot of elite units; so elite that two armies against one might not be enough. Scatter his armies as best you can, then come at him with three or four stacks.
Here you encounter the problem of army limitation. You can only control two full stacks at once (same with your opponent unless they’re being reinforced by an ally from another faction.) But there’s a way to get around this.
If you check “AI Control” on one or two of your armies, not only will these units not count toward your 40 total, they will also get their own Winds of Magic independent of your own.
For obvious reasons, this tactic should only be used if you’re willing to lose units in these AI controlled armies. But you’re nearly guaranteed to win even if you’re going against three, sometimes even four stacks. Sixty or 80 units on the field just overwhelm the AI’s allotted 40 and their reserves have to come in one at a time, making them easy to pick off if you park a few units in their reinforcement point.
One thing that helps is that the AI in Total War: Warhammer 3 is much more reasonable about peace treaties than it was in Warhammer 2. As of this writing, factions are likely to accept a peace treaty if you wipe out their invading armies. You can even get factions to pay you a lot of money for a peace treaty even if they still rank as much stronger than you in the diplomacy menu.
This is one of those quirks that might easily get patched in later updates. In that case it might be a good idea to avoid war altogether or stave it off until you can afford some more elite units.
Either way, you don’t necessarily have to invade Naggarond or the Cult of Pleasure. In fact, it’s probably better not to. See below.
Excess Cult Atelier Spam
In addition to raising the unit cap for Cultists and giving you one for free, the Excess Cult Atelier building also gives generates +3 seduction per turn with whichever faction owns the settlement you create the building in. It also requires 250 Devotees to build, but once you’ve fought enough armies you can quickly get to the point where you generate 250 Devotees per turn, either through taking Devotees after a victory or passively through the Gifts of Slaanesh.
Once you’re generating enough Devotees you can create cult buildings every turn, or even two or three times per turn. There is a cooldown for the Establish Cult action, but you can get around this by simply disbanding the Cultist after you establish a cult, creating the Excess Cult Atelier, and using the new Cultist to establish a new cult next turn.
The effect of Seduction generated per turn is reduced proportionally to the number of settlements the faction owns. Expect to have to establish a cult in nearly every settlement before you’re able to vassalize them through the Dominate ability. Remember, there’s a 10-turn cooldown for Dominate, so don’t waste it on a small faction if you’re nearly ready to Dominate Naggarond or the Cult of Pleasure.
Of course all of these hero actions will make the faction hate you, so it should only be done if you’re confident you can hold them off. If you can handle their armies that will make vassalization even easier. Defeated lords and heroes receive a Gift of Slaanesh, and each Gift of Slaanesh also generates both Seduction and Devotees.
This might be the preferred method of dealing with Naggarond and The Cult of Pleasure. By playing defensively for a while and patiently building Excess Cult Ateliers, you can easily vassalize the first and second most powerful factions in the game.
Proliferate Cults
If you’re generating enough Devotees to think about Excess Cult Atelier spam, you might consider trying out the Proliferate Cults option. If you’re lucky, this will give you a cult in one of the Cathain factions, allowing you to use the Excess Cult Atelier spam on a rich, powerful nation that’s too far away to really threaten you. Vassalizing Miao Ying or Zhao Ming can get you an extra 10,000 a turn in tribute, plus they’re not too far away to send armies against Sylvania or others in that region when you’re ready to invade The Old World.
To Daemon or Not to Daemon?

You’re going to face a dilemma early in the game: do you upgrade your Herald to an Exalted Keeper of Secrets or no? It’s hard to resist such a fun mechanic, but be advised that the Exalted Keeper of Secrets is actually less effective than the Herald of Slaanesh. It’s not just because of the lost skill points. Ascension to daemonhood also makes her a bigger target for enemy archers, so she’ll spend a lot of time avoiding enemies she could have simply charged at if she’d remained a Herald. Not only that, an Exalted Keeper of Secrets can’t really play “bull in a China shop” against enemy units as well as N’Kari can, but Heralds can hold their own in melee against huge globs of units just as well as the Cultists do.
If you got the Chaos Lord rather than the Herald, he will become a Daemon Prince rather than an Exalted Keeper of Secrets. This does come with a few advantages. The Daemon Prince has magic whereas the Chaos Lord does not. The Daemon Prince gets a combination of Lore of Slaanesh and Lore of Shadows, but he does not get the best spells for each. He gets Lash of Slaanesh and Pitt of Shades, which are good, but you don’t get Penumbral Pendulum or Slicing Shards, which are better.
The Daemon Prince also suffers from the same size disadvantage of the Exalted Keeper or Secrets with the added drawback that he likes to fly. Why is that a bad thing? Because single-entity flying units like Leon Leoncoeur will tear his head off. You can tell him to land but he has a bad habit of hopping back into the air when he’s got trouble pathfinding.
Mounts for Single-Entity Units

Typically, you want to keep your lords and heroes on their Chaos Steeds or Steeds of Slaanesh by default. But the other mounts can be situationally useful.
Cultists of Slaanesh and Chaos Sorcerers get upgraded to Chaos Warshrine, which make them far less useful. It slows them down and turns them into a big target, making them even more vulnerable to archer fire than N’Kari. But the Chaos Warshrine does also turn the hero into a siege attacker, so it can be helpful to put your hero on one right before attacking a walled settlement if you don’t have any other siege units in the army. Just be careful with it. And if you have one available, it’s best to do this with your Chaos Sorcerer rather than your Cultist. Your Cultist’s summon abilities require her to spend time in melee in order to activate them, and this gets awkward when she’s on a Warshrine. But your Sorcerer can just sit on it behind the front lines and spam spells.
Your Heralds, Alluresses and Chaos Lords can also get Seeker Chariots and Exalted Seeker Chariots. Archers love to shoot them, but they’re very fast and can really put the smackdown on the enemy flanks using the good ol’ hammer-and-anvil tactics. This strategy is probably best used if you have a bunch of Marauders or other melee infantry to hold the line.
When to Upgrade to Chaos Warriors
It’s not bad to have a few units of Chaos Warriors early on in the game, but you can deal with most of your biggest threats by spamming Marauders. It isn’t always easy and you may have to resort to some of the cheeses mentioned above.
But it’s probably a good idea to upgrade before the End Game Crisis. You don’t want to send Marauders to deal with The Wild Hunt or A Grudge Too Far.
Army Compositions
You can continue the hammer-and-anvil style army after you upgrade to Chaos Warriors and/or Chosen. Chosen aren’t really necessary; there’s nothing you can do with Chosen that you can’t do with Chaos Warriors.
One or two casters are always good to add to a melee infantry stack, casting Penumbral Pendulum to the enemy lines. Every army should also have at least one Cultist for added movement range, plus they have a lot of utility in battle. A chariot unit would be a good addition also for when the winds of magic run out. Putting one of your casters on a chariot can have them fill a duel role, casting Pendulum and dealing splash damage to the enemy flanks. You’ll have to be more careful with them though or else they’ll get shredded by archers.
Currently Slaaneshi heroes and lords are all good in melee, so hero-Spam is another very effective option for the Seducers of Slaanesh. If you’ve been using the Excess Cult Atelier cheese, you’re going to have capacity for all the Cultists you could ever need and Cultist stacks are very dangerous to the AI, even before they level up enough to summon Daemonettes and Keepers of Secrets.
When using all Cultist stacks with a Herald as a lord, it’s probably better to recruit a Herald with the Lore of Slaanesh. Cultists are great at surviving in the middle of enemy globs and take very little damage if you cast Slicing Shards right on top of them.
You can also use a mix of Chaos Sorcerers and Alluresses in much the same way, either exclusively or mixed with Cultists. If it’s a choice between the two, Chaos Sorcerers are better. They have abilities which the Alluresses do not have, and they route rather than disintegrate. In practice though, you’re probably going to be spamming both because of capacity issues. And it’s usually not difficult to save Alluresses from disintegrating.
Late game, you also have the option of recruiting Soul Grinders of Slaanesh and/or Keepers of Secrets. While these might be too fun to pass up as doomstacks, they are tragically not as efficient as hero spam. They take multiple turns to recruit, cost more in upkeep, and your heroes just have much better spells and abilities.

They’re really cool, though
Recap
Make the most of your first four turns to get a strong start.
Spam Marauders and Marauders with spears early game. Upgrade to Chaos Warriors when you can. Skip Daemonettes, they’re basically made of glass.
Lean heavily toward lords and heroes with Lore of Shadows, but some Lore of Slaanesh is good also for Slicing Shards.
Exploit your vassals. Let them zerg your enemy to keep them distracted until you can deliver the coup de grâce, either by invading or raising Seduction until you can use Dominate.
For more nerd news, follow The Southern Nerd on Facebook and Pinterest
